How to run a one-day Agile project kick-off workshop that sets you up for success
Get everything you need to run a practical discovery workshop that kicks off your project the way you plan to continue. Inspire and align your team behind a common vision of the outcomes you want to achieve, and the steps you need to take to get there. Ruthlessly prioritise only what’s needed to create a product your customers will love. Move step-by-step from discovery to development in the space of day.
Your product discovery workshop will help you discover:
The guide is for anyone planning an Agile project discovery workshop. You may be:
This guide includes:
Learn more: Get a detailed introduction to running your project kick-off workshop

| Activity | Duration |
|---|---|
| Introductions | 10 minutes |
| Product Vision | 45 minutes |
| Press Release | 45 minutes |
| Break | 10 minutes |
| Elevator Pitch | 30 minutes |
| Success Sliders | 20 minutes |
| Pragmatic Personas | 45 minutes |
| Lunch | 30 minutes |
| User Story Mapping | 90 minutes |
| Prioritisation | 30 minutes |
| Break | 10 minutes |
| User Story Writing | 90 minutes |
| Team Charter | 20 minutes |
You want to combine insight into your customers’ needs with expertise in meeting these needs. So you need:
Just as importantly, everyone who takes part needs to be engaged, open to all ideas and ready to contribute.
Learn more: Get a detailed guide to your project kick-off agenda

Presenting the Product Vision at the discovery workshop is a chance to inspire the team by depicting the better future you’ll be building. The vision brings the team together, giving them both destination and motivation.
The Product Owner can present the vision solo or as a tag team, ideally with the chief executive or another senior leader. This shows that the powers-that-be are behind the project.
The Product Vision explains why you’re building the product. It paints a picture of the way the product will improve the lives of your customers, and how this benefits your organisation.
The presentation:
Once your presentation is over, it’s a chance for you to answer any questions the team have.
The next two activities let the team flesh out the vision. Both the Press Release and the Elevator Pitch help the team better understand the benefits the product will bring. You can run either or both of these exercises.
Learn more: Get a detailed guide to product vision presentations that inspire

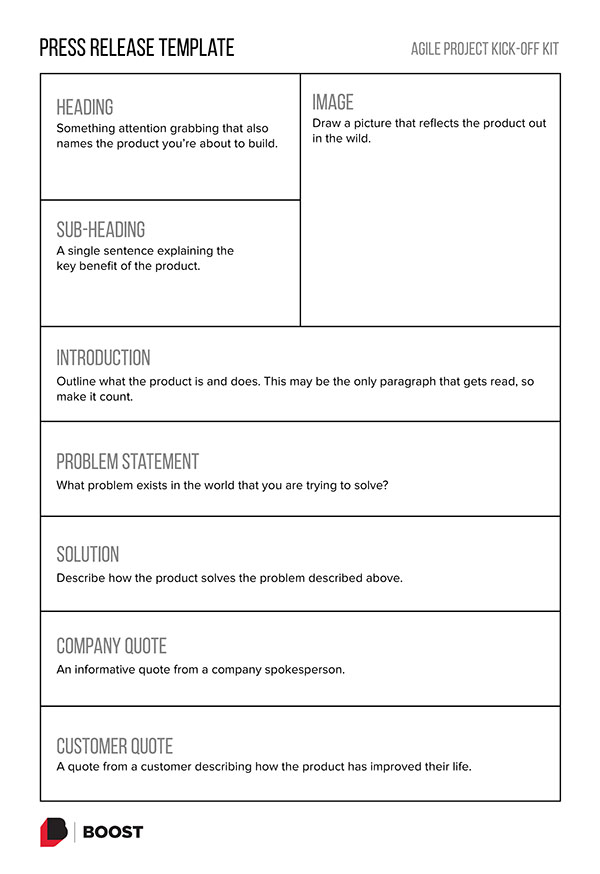
Producing a Press Release is a fun way to get a shared view of your project’s purpose by touting the benefits it’ll bring.
Imagine your project is complete and you’re writing a press release to plug your awesome new product.
The Press Release activity:
Set the scene. You might say something like, “Imagine you’re in a cafe. You’ve got your coffee and cake and you’re reading the paper. Your product is live, you’ve sent out a press release and the newspaper has picked it up. What will the article say?”
If people get stuck, remind them that you’re not looking for the perfect press release; the conversation is as important as the final product.
Give each group a couple of minutes to present their team’s release to the workshop. Discuss what you’ve learned. Ask the team if they noticed any:
Learn more: Get a detailed guide to the Press Release template

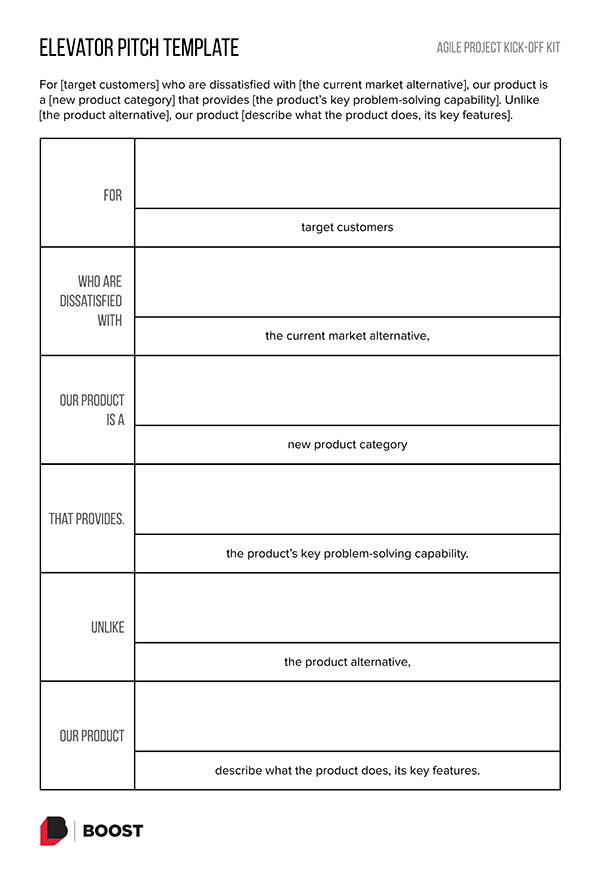
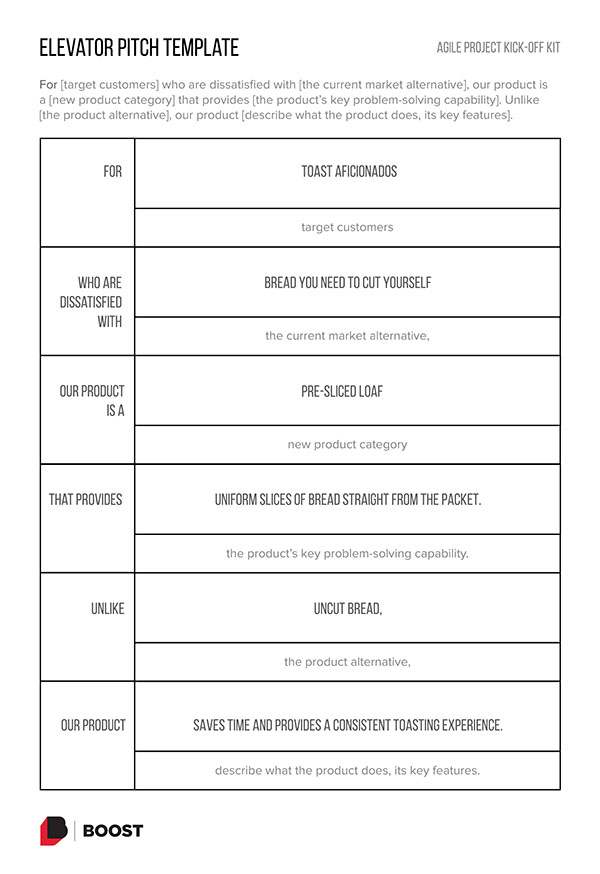
Writing an Elevator Pitch at your discovery workshop helps distil the team’s shared vision for your product, and the edge it will have against its competitors.
This is based on the template from Geoffrey Moore’s book Crossing the Chasm.
For [target customers]
Who are dissatisfied with [the current market alternative]
Our product is a [new product category]
That provides [the product’s key problem-solving capability].
Unlike [the product alternative],
Our product [describe what the product does, its key features].
This activity keeps you busy as a facilitator. You need to capture suggestions as the team call them out and then identify the consensus view based on the discussions.
People can get hung up on finding the perfect wording. If people fixate on individual words and phrases, listen for the essence of their ideas and offer alternative phrasings.
Learn more: Get a detailed guide to the Elevator Pitch template

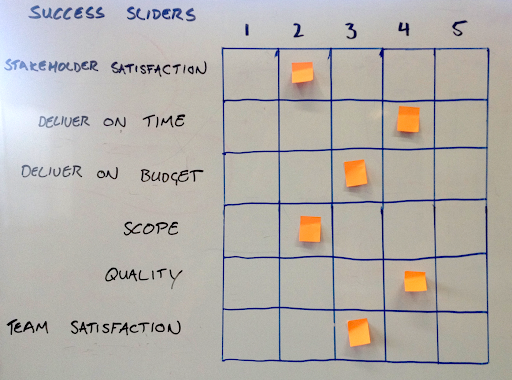
Success Sliders are a simple way for the team to agree on the project’s priorities. They help you kick off your project with a common understanding of what success looks like.
Success Sliders make explicit the fact that your project has finite resources and give you a transparent way to make the necessary trade-offs.
On a poster or whiteboard, draw a grid of 6 rows by 5 columns. Label the 6 rows with your success factors. Number the columns 1–5. Place post-it notes in column 3 of each row.
Tell the team to work together to decide the priority of each success factor. The more important the factor the higher the number of the column it sits under.
Here’s the catch: the total value of all factors must equal 18. This means that if you raise the value of one factor you’ll have to lower the value of another.
Learn more: Get a detailed guide to the Success Sliders activity

The Agile Project Kick-off Kit collects all the tools, templates and tips you need for a successful discovery workshop into one handy 39-page PDF.
“Brilliantly done – very impressive.” — Jimmy Ling, Agile Delivery Lead, NAB
Buy the kit
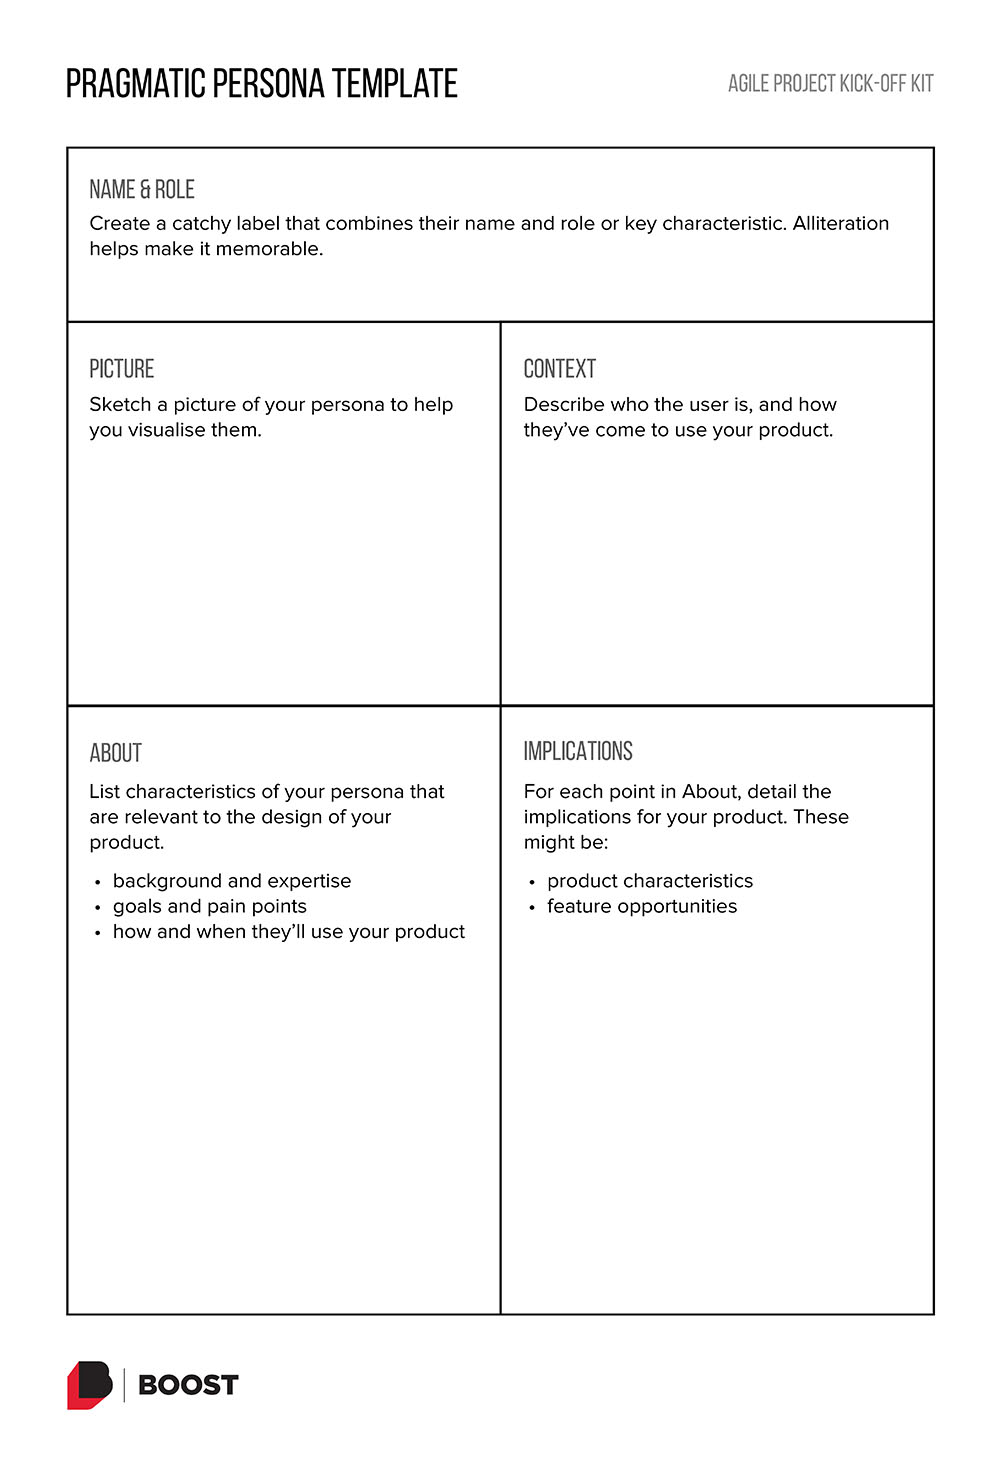
Pragmatic Personas let you quickly and collaboratively turn existing customer insights into memorable characters that the team can design the product for.
These personas are pragmatic because they’re quick, collaborative, use your existing customer insights and produce something the team can easily refer to as they work.
Pass around the template or draw it on the whiteboard. Describe what’s needed in each section.
Brainstorm your key customer types and pick the top three. While “everyone” could conceivably be a customer, if you try to build a product for everyone, you won’t satisfy anyone.
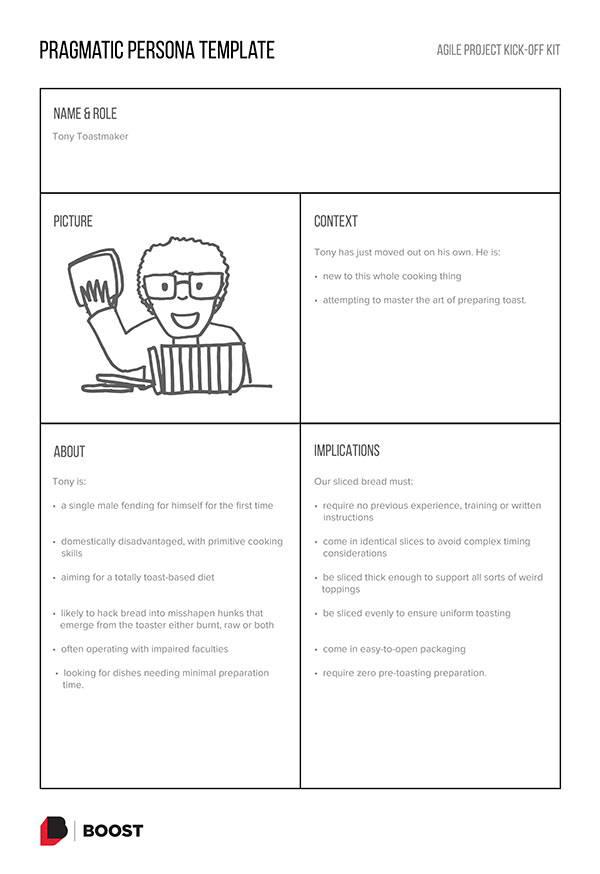
Alliteration helps make the names memorable. For example: Tony Toastmaker and Sally the Sandwich Addict.
You might find people start out anxious about their artistic talent but once they get going they tend to have fun.
Keep the Context section down to a few bullet points.
Only list characteristics of your persona that are relevant to the design of your product.
As a group, rank the personas in order of importance. Consider who your most valuable customers are and who will get most benefit from the product. Give each persona a different coloured sticky dot — you’ll use these to tag your user stories later.
Learn more: Get a detailed guide to the Pragmatic Personas template
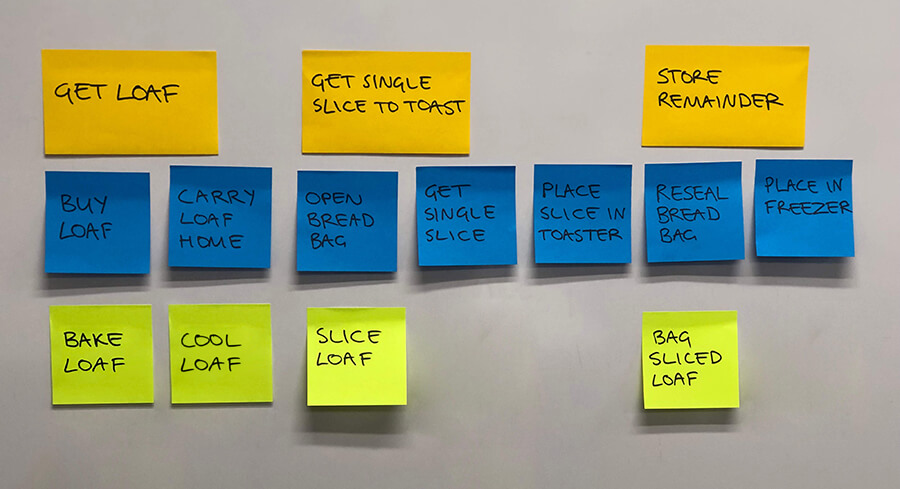
User Story Mapping is a way of brainstorming all the work you’re going to need to do to build the product, then breaking it down into a structure that will make your development simpler and more manageable.
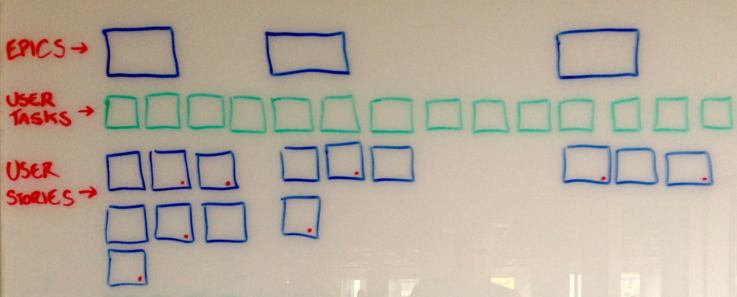
Describe the purpose of User Story Mapping and outline the five-step process.
This works best as a silent brainstorm. Working alone, each participant writes down every step the user will take through the product from start to finish, one step per post-it. This phase is about breadth not depth.
Stick each post-it up on the wall in the order the users will do the tasks.

As a team, look for logical groupings within your line of user tasks. These groups are your “epics”. Write epic labels on wider post-its and place them above the user tasks.
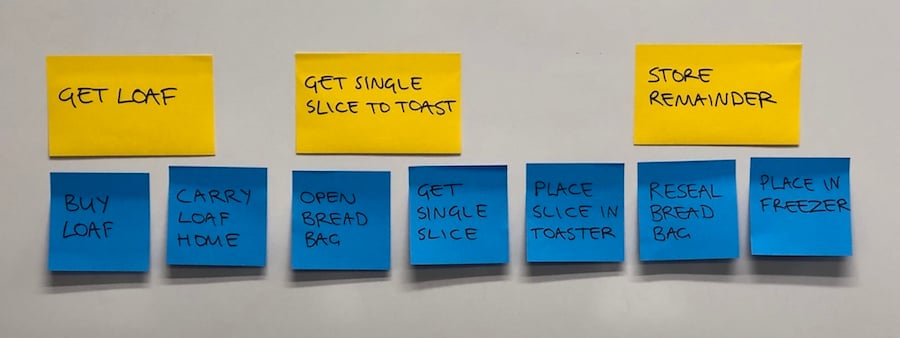
Ask the team to think about everything that needs to be in place in your product to let the user achieve the goal of the epic. Each of these smaller units becomes the name of a user story.
As a team, post them up under the user tasks, and the wider epic, that they apply to. To make sure your map is comprehensive, get people to walk down the line looking for gaps.
Learn more: Get a detailed guide to user story mapping

Prioritising your user stories lets you identify the business value of each story, do the most valuable work first, deliver quickly in order to get feedback, and then review the remaining work based on what you’ve learned.
Because this is an Agile discovery workshop, you’re not aiming to define all requirements, just discover the least you can do to achieve your project vision.
You’ve already ranked your personas by priority and given each of them different coloured dots. Decide which stories mainly benefit one persona and stick that persona’s dot on those stories.
Next we decide which stories we Must, Could, Should and Won’t do (MoSCoW for short).
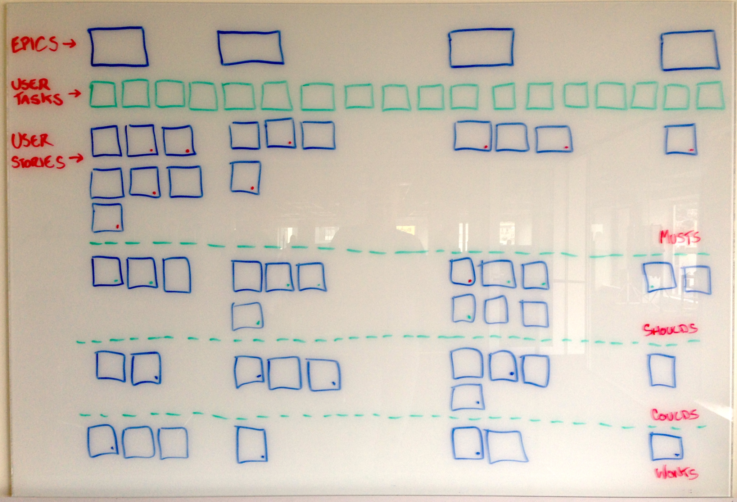
Stick three rows of tape across the wall. Move all the Musts above the top line of tape. While you’re at it, move all the other stories below the line, grouping them into Shoulds, Coulds and Won’ts.
You’ve now got your stories ranked in priority from top to bottom. At the top, the collection of Musts is your Minimum Viable Product.
Be ruthless. The critical question is whether the customer can still achieve their goal if you don’t do a particular story.
Learn more: Get a detailed guide on how to prioritise user stories

Get the hang of writing user stories by starting with the must-do stories that make up your Minimum Viable Product.
Because they describe a feature of the product from the customer’s point of view, user stories are a great way of expressing the benefits of a project.
There’s a simple formula for writing user stories so they focus on the customer benefit:
As an [actor] I want [action] so that [achievement].
The actor is often a type of user (and may be one of your personas). The action is what they want to do using your product. The achievement is why they want to do it — the benefit they’ll get.
So a user story for a movie theatre booking example might be:
As a moviegoer, I want to choose the seats I book so that I get the best available view of the screen.
This statement of the customer benefit is the core of the user story. You can add more detail throughout the iteration as you discuss the story with the team.
Learn more: Get a detailed guide to user stories

Create a tight team with a shared commitment by jointly deciding how you’re going to work together.
It’s nice to cap off your discovery workshop with an exercise that bonds the team together and builds a shared understanding and commitment.
You can include:
As a rule of thumb, if your charter is too big to remember, it’s probably too big.
You don’t need the stakeholders who have been part of the rest of the Kick-off, just the team — including the Product Owner — and the facilitator.
As facilitator, you should avoid making suggestions. Instead, try to ask open questions. These might be things like:
It’s best to have both a physical and an electronic copy. Post the paper version beside the project board and put a photo or transcript in your digital tool.

Learn more: Get a detailed guide to creating a Team Charter

You now know why you’re building the product, who you’re building it for and how your team is going to work together.
You understand what you need to prioritise in order to deliver a working solution you can test and tweak until your customers can’t get by without it.
Ready! Set! Deliver!
If you’re based in New Zealand, Boost can plan and facilitate your discovery workshop for you. Contact us to learn more. It’s a great way to get clear what you want to achieve, how long this will take and how much it will cost.
The Agile Project Kick-off Kit collects all the tools, templates and tips you need for a successful discovery workshop into one handy 39-page PDF.
“Brilliantly done – very impressive.” — Jimmy Ling, Agile Delivery Lead, NAB
Buy the kit